Copy a Jira project configuration: Bulker release notes Nov 2026
Copy a Jira project configuration to other projects with Bulker's Copy Space Config: link or clone schemes, review status migration, and undo.
Bulker 6.4.0 went out on 10 November, followed the same day by three small fixes (6.5.0 to 6.7.0) from the first customer runs. The release adds one tab, Copy Space Config, and it answers a request we had heard in almost every demo: "we have one project set up right — how do we copy a Jira project configuration to the twenty others?"
Bulker 7.0.0 followed on 16 November with the Undo dialog described below, the operation log on Forge SQL and a new Overview tab that scans the site's configuration (read-only, the first scan starts within the hour) and shows it in charts.
Versions 6.4.0 to 6.7.0 asked for no new permissions and installed themselves on most sites; 7.0.0 adds a storage module, so a Jira admin approves it once under Settings → Apps → Manage apps. Below: what the new tab does, how to run a copy step by step, what happens to workflow schemes on projects that already have issues, and how to undo.
The problem: one good project, many copies by hand
Jira Cloud lets you create a new project with another project's shared configuration. It does not let you take an existing project and make it look like your reference project. Every scheme has to be reassigned by hand, in the project's settings, one scheme type at a time, one project at a time — and a workflow scheme on a project with issues drops you into Jira's status migration wizard every time.
For eight scheme types and twenty projects that is 160 admin screens. Bulker has done the assignment part in bulk for a while (the Space Schemes tab). Copy Space Config adds the other half: pick the source once, pick the targets once, and decide per scheme type what should happen.
See the guide: How to bulk change Jira schemes across multiple projects.
What Copy Space Config does
Open Settings → Apps → Bulker → Copy Space Config, pick a Source space and one or more Target spaces. The table "What to copy" lists every scheme the source project uses — issue type, workflow, issue type screen, field configuration, permission, notification, issue security and priority scheme — and for each one you choose:
| Choice | What happens on each target |
|---|---|
| Skip | Nothing. |
| Link the same scheme | The target starts using the source's scheme. One scheme, several projects: a change in it reaches all of them. |
| Clone, then link | Bulker creates a copy of the scheme, named for the target (for example BETA: Kanban Issue Type Scheme), and links the target to the copy. The target gets its own scheme that can be changed independently. |
A clone copies the scheme itself. What the scheme refers to — workflows, issue types, screens, field configurations, priorities, groups, roles — stays shared with the source. That is the same thing Jira does when you copy a scheme in its own admin screens.
Nothing changes until you click Apply. Only live, company-managed projects can be a source or a target; team-managed projects keep their own settings and are not listed.
How to copy a Jira project configuration, step by step
Step 1 — Pick the source and the targets
Choose the project whose setup is right. The "What to copy" table fills with its schemes. Then pick the projects that should look the same. The source itself cannot be a target.
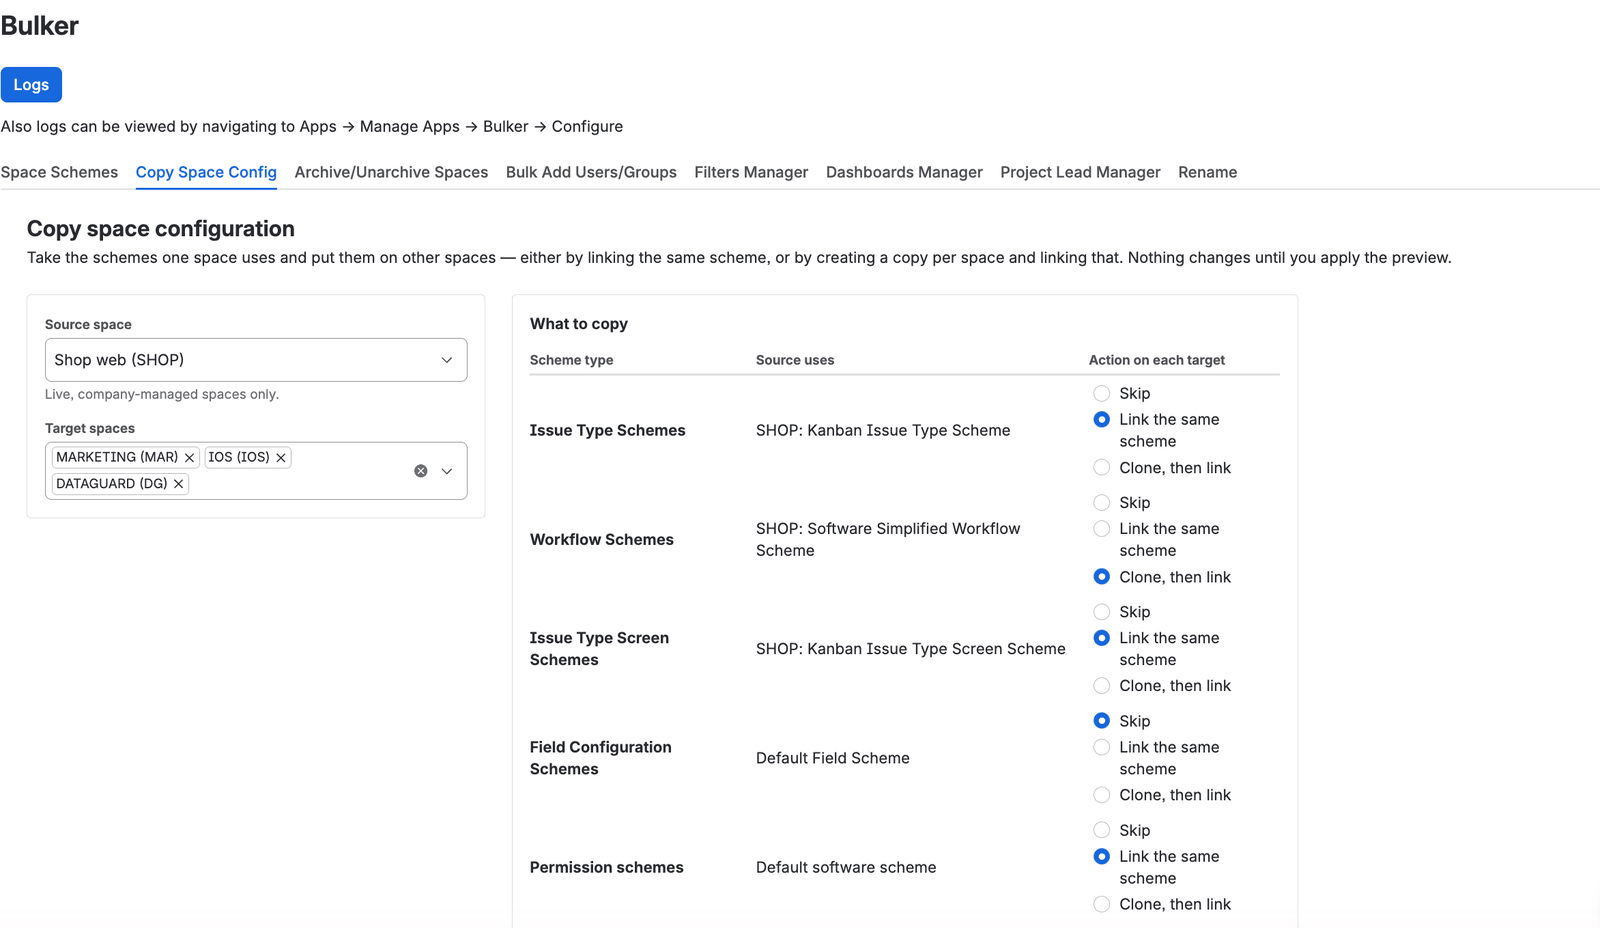
Source, targets, and one decision per scheme type
Step 2 — Decide per scheme type
For every row choose Skip, Link or Clone. A type the source does not set ("uses the default") cannot be copied — there is nothing to link to.
Step 3 — Preview
Click Preview changes. The plan has one row per target and scheme type:
- Link — the target will be linked to the source's scheme.
- Clone + link — the exact name of the copy that will be created.
- Already set — the target already uses this scheme; nothing to do.
- Blocked — the row cannot be applied, with the reason.
The common reason for a block is an issue type scheme whose types are in use: Jira refuses to link a scheme while the target's issues use issue types the scheme does not have. The preview says how many issues and which types. Choose Clone instead — the copy is widened with those types and no issue is touched.
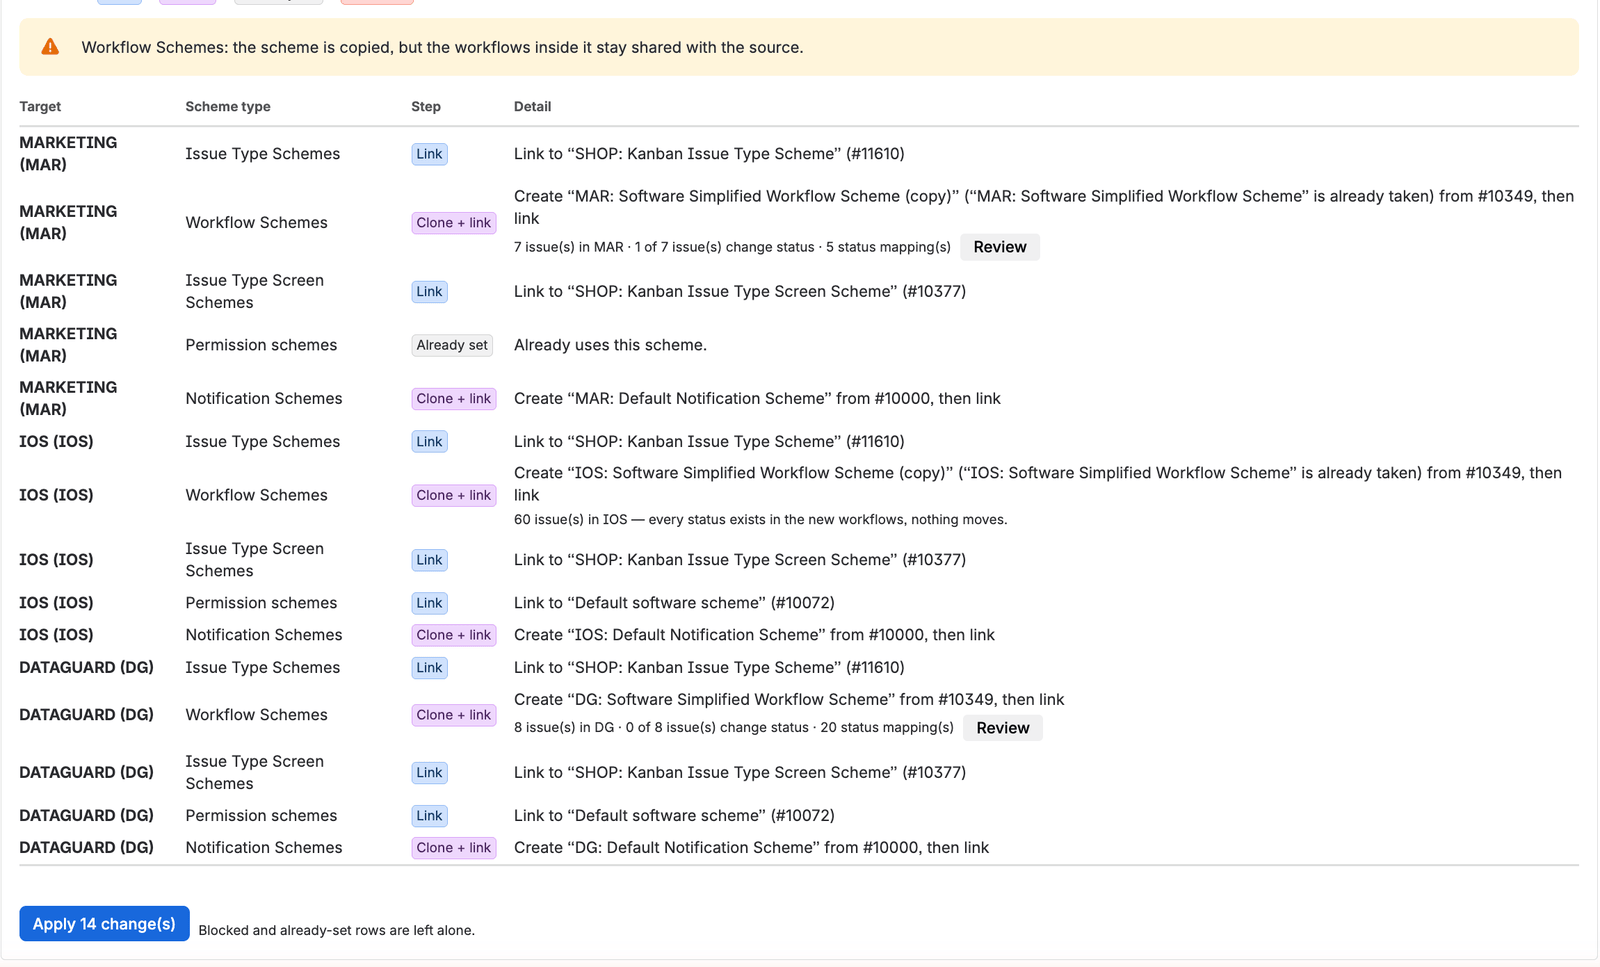
The preview: every change per target, before Apply
Step 4 — Apply
Click Apply N change(s) and confirm. The Applied table shows the outcome of every row, with Jira's own message when something was refused. Every link and clone is also written to Bulker's Logs, next to changes from the Space Schemes tab.
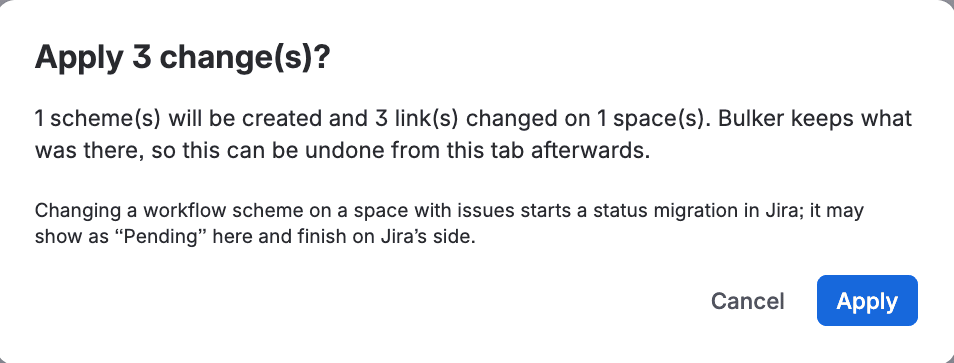

Step 5 — Check the targets
Open a target's project settings. The schemes there are now the source's (linked) or the copies (cloned). Workflows, screens and fields behind them are the shared ones.
Copying a workflow scheme to Jira projects with issues
An empty project simply takes the new workflow scheme. A project with issues cannot: its issues sit in statuses the new workflows may not have, so Jira has to migrate them. Bulker does not hide that step; it brings it into the preview.
The preview row says how many issues will change status — "0 of 8 issue(s) change status" when the new workflow already has every status in use — and offers Review:
- One section per issue type, with the workflow it will use.
- Each row: the status Now, the status it Becomes (coloured by category), a Change to selector with the statuses the new workflow has, and how many Issues sit in that status today.
- The suggested mapping keeps the same status when the new workflow has it, otherwise a status with the same name, otherwise the first status of the same category, otherwise the workflow's initial status. Change any target you like.
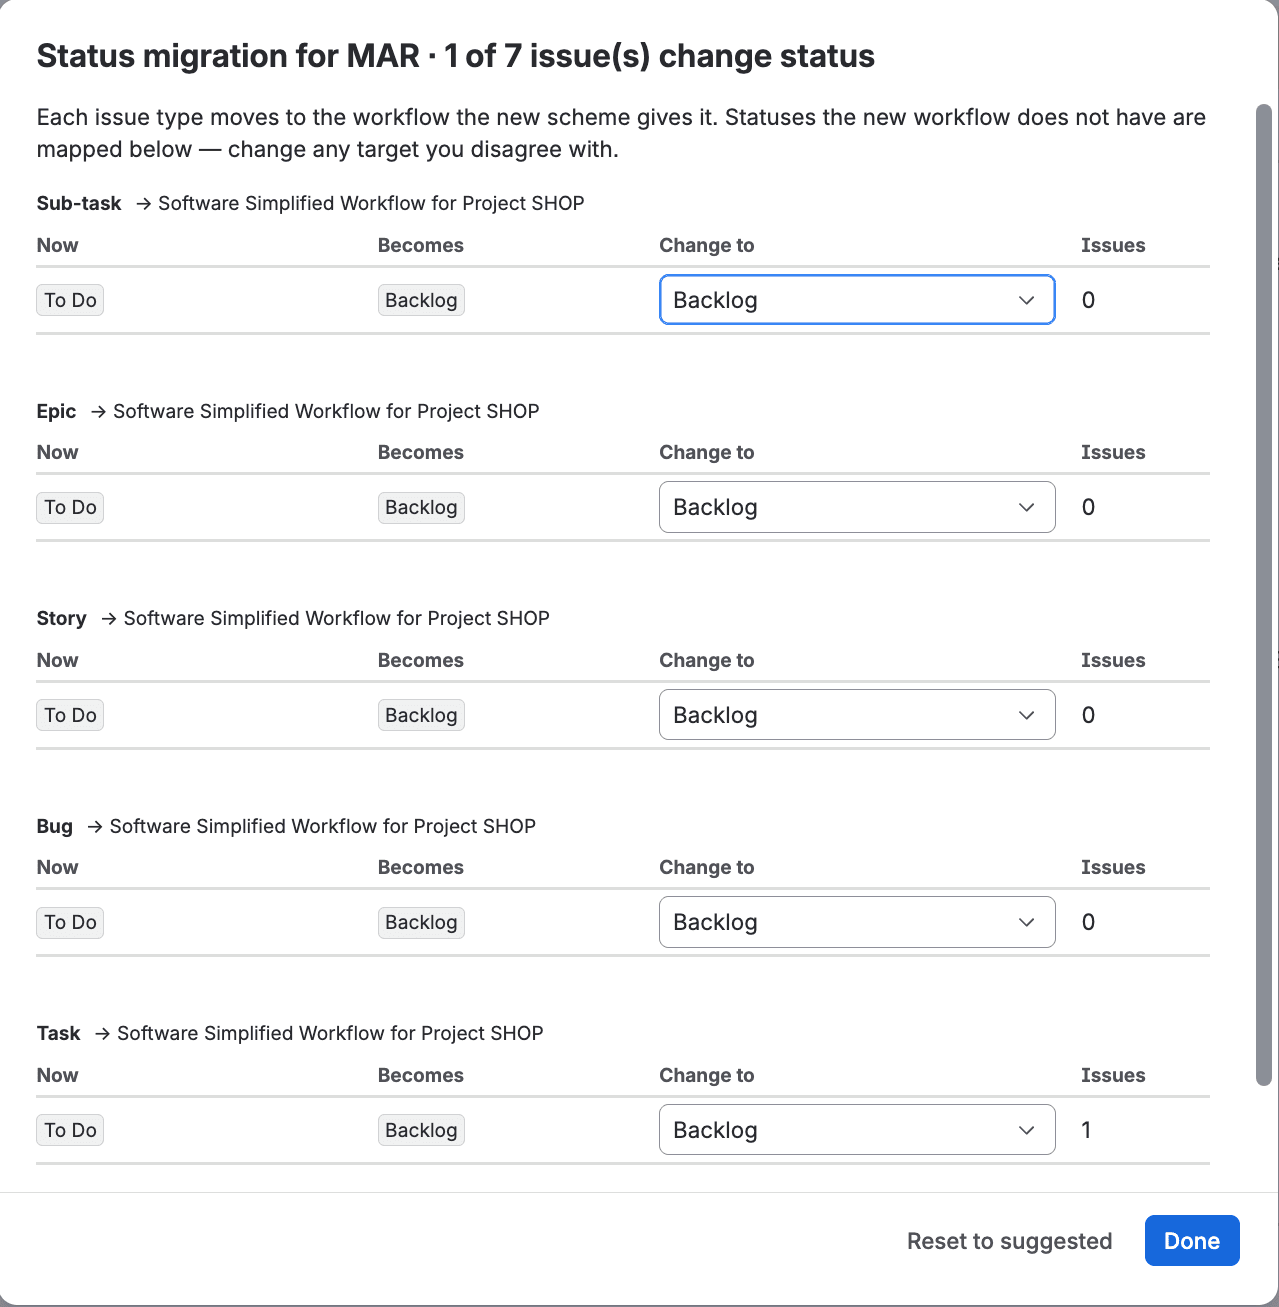
Status migration, reviewed per issue type before Apply
Jira sometimes asks for a mapping for an issue type the project does not even use, because that type has its own workflow in the old or the new scheme. Since 6.7.0 Bulker asks Jira which types it needs and lists them in a separate group, "Not used in KEY, but Jira still asks", so the migration no longer fails on a type you never see in the project.
Your choices travel with the plan. Jira runs the migration as a background task; Bulker waits for it and reports the result. A long migration may still be running when the result appears — the row then carries the task id, and the target's project settings show the progress.
How to undo a Copy Space Config run
Every applied copy stays undoable, and the last five copies are kept. A line under the results says The last N copies can still be undone with an Undo… button. The dialog lists each copy with its time and the admin who ran it, and a table per copy: space, scheme type, what the space had before, what it has now, and what the undo will do — put the previous scheme back, delete the clone.
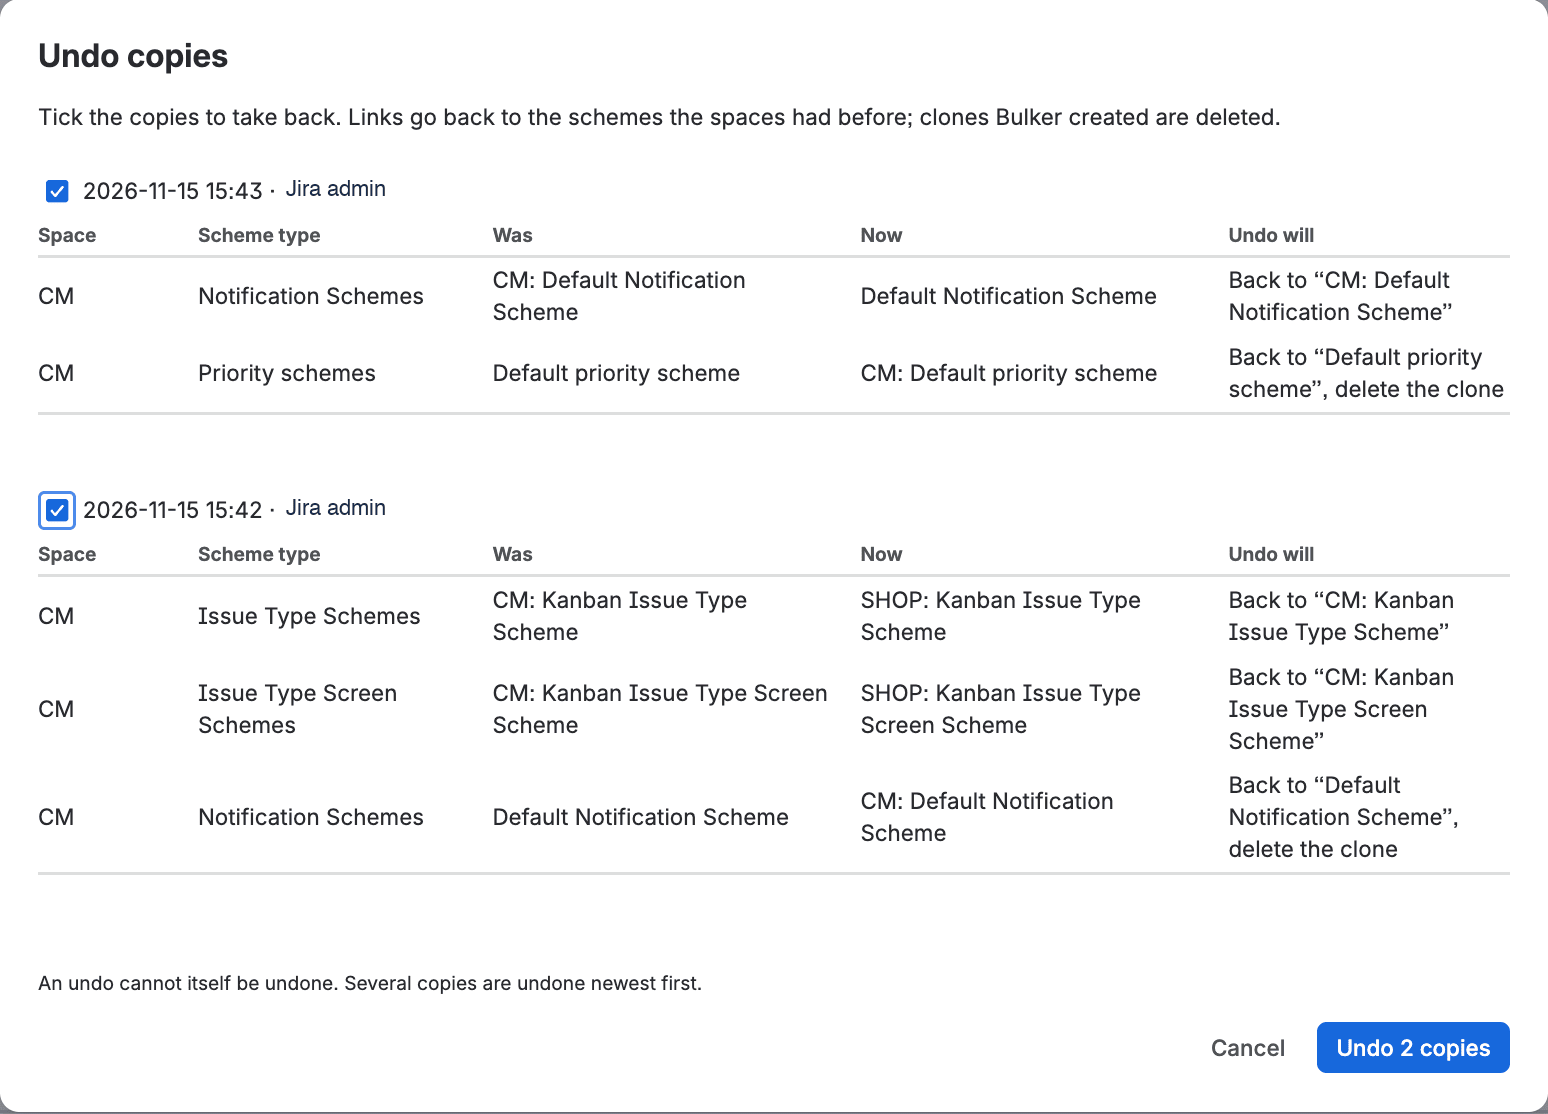
The Undo dialog: what each copy changed and what undo will do
Tick the copies to take back and click Undo N copies. Several copies are undone newest first, so the projects end up exactly where they were before the oldest ticked copy. A workflow scheme is switched back with the same migration review. An undo itself cannot be undone.

After undo: links back, clones deleted
NOTE: Undo puts schemes back; it does not restore issues that were moved to a different status by the migration in between. Review the mapping before you apply, not after.
Good to know
- Names of clones. A clone is named with the Rename tab's naming policy for that scheme type if you have one, otherwise
KEY: scheme name. If the name is taken, the copy gets(copy),(copy 2)and so on. Issue security scheme names are limited to 60 characters by Jira. - Notification schemes. Recipients of the type "email address" are not copied — Jira no longer allows creating them. The result says how many were dropped.
- Permission schemes on a Free plan. Jira refuses to change them; the row shows Jira's message.
- Field configuration schemes are cloned with Jira's own clone call. On a site where the new field scheme API is not yet enabled, the clone is refused with Jira's message and Link still works.
- Cross-type projects (software → service management): the type-bound schemes — issue type, workflow, screen, field configuration — get a caution, not a block. Check the result in the target afterwards.
The three fixes after 6.4.0
- 6.5.0 — the migration dialog said "8 issues will be migrated" over a table of zeros when every status already existed in the new workflow. It now says "0 of 8 issue(s) change status" and names the types with nothing to move.
- 6.6.0 — status mappings are collected for every issue type that has its own workflow in the old or the new scheme, not only for the types the project uses.
- 6.7.0 — Bulker asks Jira directly which issue types need a mapping (the list Jira checks when it switches the scheme) and shows them in the "Not used in KEY, but Jira still asks" group. This is what fixed "Status mappings are required for issue type ID: 10002" on a customer site.
Operation log: every run, kept for 45 days or a year
Until now, Bulker's operation log stored failures in detail and only counted successful changes. In 7.0.0 the log lives in Forge SQL, and every operation is listed, successful ones included. One operation keeps up to 2,000 rows in detail; anything beyond that is summed up in one line. Entries are kept for 45 days on the Standard edition and for 365 days on the Advanced edition; a trial keeps them for 7 days. Older entries are deleted automatically, and a Jira site keeps at most 200,000 entries. The Logs page offers time ranges from 30 minutes to All, with 1 year on Advanced. Jira Automation actions show up too, with a Type that starts with "Automation:" and the rule actor as the user. Existing entries move to the new storage once, after the update.
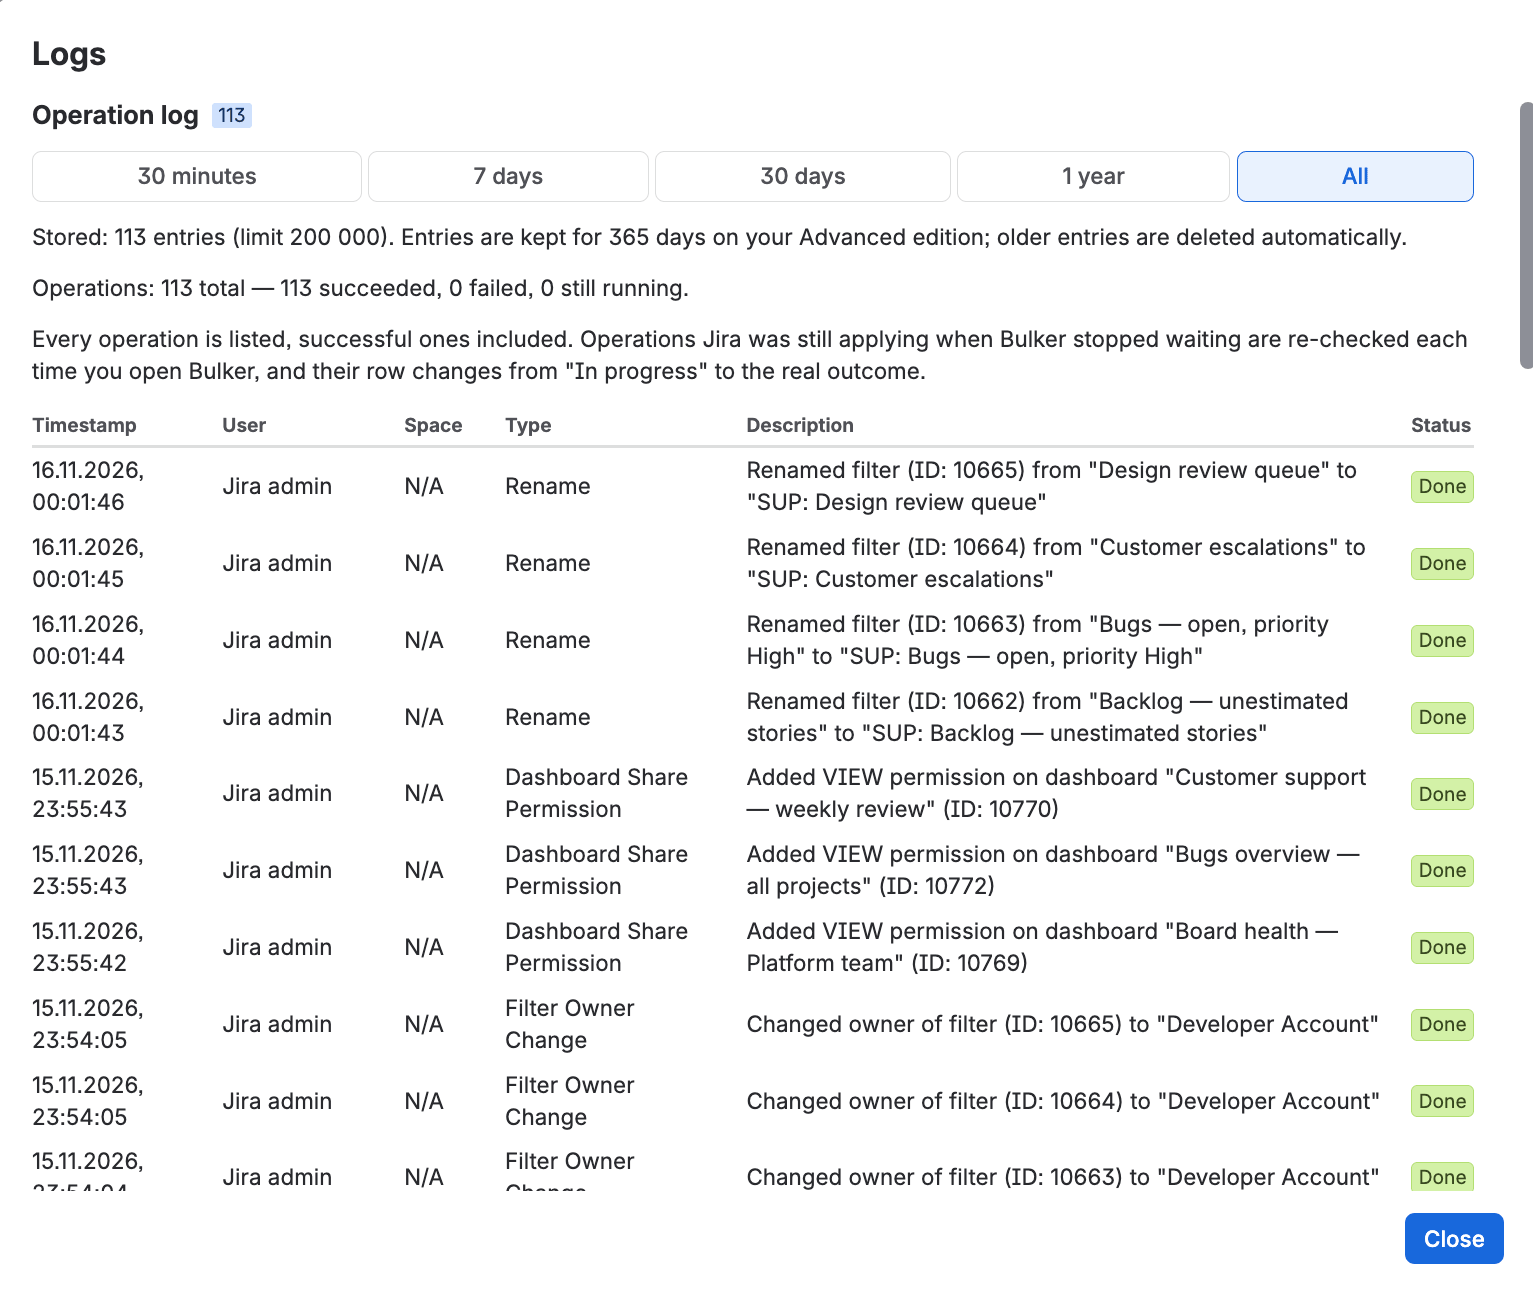
Every run, successful ones included, with Jira's answer
FAQ
Does Copy Space Config move or change any issues?
No. Linking and cloning only change which schemes a project uses. The one case where issues are touched is a workflow scheme on a project with issues: Jira migrates those issues to the statuses you reviewed in the dialog. Issue type schemes are never forced; if the target's issues use types the scheme lacks, the row is blocked or the clone is widened.
How do I copy a Jira project configuration to several projects at once?
Open Settings → Apps → Bulker → Copy Space Config, pick the source project and the target projects, choose Link or Clone per scheme type, click Preview changes, review the plan and click Apply. One run covers every target.
What is the difference between Link and Clone when copying a Jira scheme?
Link makes the target use the source's scheme — one shared scheme, so a later change reaches every linked project. Clone creates a copy named for the target and links the target to that copy, so the target can be changed on its own. Both leave the workflows, screens and fields behind the scheme shared.
How do I undo a copy?
Under the results click Undo…, tick the copies to take back and click Undo N copies. Bulker puts the previous schemes back and deletes the clones it created. The last five copies stay undoable; an undo cannot itself be undone.
Can I copy to team-managed projects?
No. Team-managed projects keep their own settings inside the project and do not use shared schemes, so they are not listed as sources or targets. Company-managed projects only.
Does the update need new permissions?
No new permissions in any of them. Versions 6.4.0 to 6.7.0 add no modules either, so Jira installs them automatically. 7.0.0 adds a storage module (Forge SQL) for the log, so an admin approves it once under Settings → Apps → Manage apps, the same as for sites still on a version below 6.0.
Try it on your own site
Copy Space Config is part of every Bulker edition. Install Bulker — Bulk Schemes & Configuration Manager for Jira from the Atlassian Marketplace, pick the project you are proud of and copy it to the ones you are not. For the wider picture, see Bulk Jira admin: how to save 3 hours a week.
Step-by-step guides: How to copy a Jira project configuration to existing projects, Change the workflow scheme on Jira projects that already have issues and How to bulk rename Jira schemes, screens and filters.