How to bulk change Jira schemes across multiple projects
Bulk change Jira schemes in one run: assign a workflow, permission or notification scheme to many projects with Bulker's Space Schemes tab in Jira.
Jira Cloud has no screen for changing a scheme on more than one project. If twenty projects need the new permission scheme, you open twenty project settings pages and pick it twenty times. The Space Schemes tab of Bulker is the way to bulk change schemes in Jira: pick the projects, pick the scheme type, pick the new scheme, and one button assigns it to every project you selected.
This guide walks through the tab step by step, explains what happens when a workflow scheme meets a project that already has issues, shows what the operation log records, and lists what Jira refuses and what cannot be undone.
What the Space Schemes tab does
The tab is the first one in Bulker's admin page. Its heading reads Assign a scheme to spaces — Bulker uses Atlassian's newer word "space" for what the REST API still calls a project. You select one or more spaces, one scheme type and one new scheme, and Bulker assigns that scheme to each space in turn, reporting the outcome per space.
Eight scheme types are offered, in this order:
- Workflow Schemes
- Issue Type Schemes
- Issue Security Schemes
- Issue Type Screen Schemes
- Field Configuration Schemes
- Priority schemes
- Notification Schemes
- Permission schemes
One run changes one scheme type. To replace a project's whole set of schemes with another project's configuration, use the separate Copy Space Config tab, which links or clones all of a source project's schemes onto other projects and has its own preview and undo.
See the guide: How to copy a Jira project configuration to existing projects.
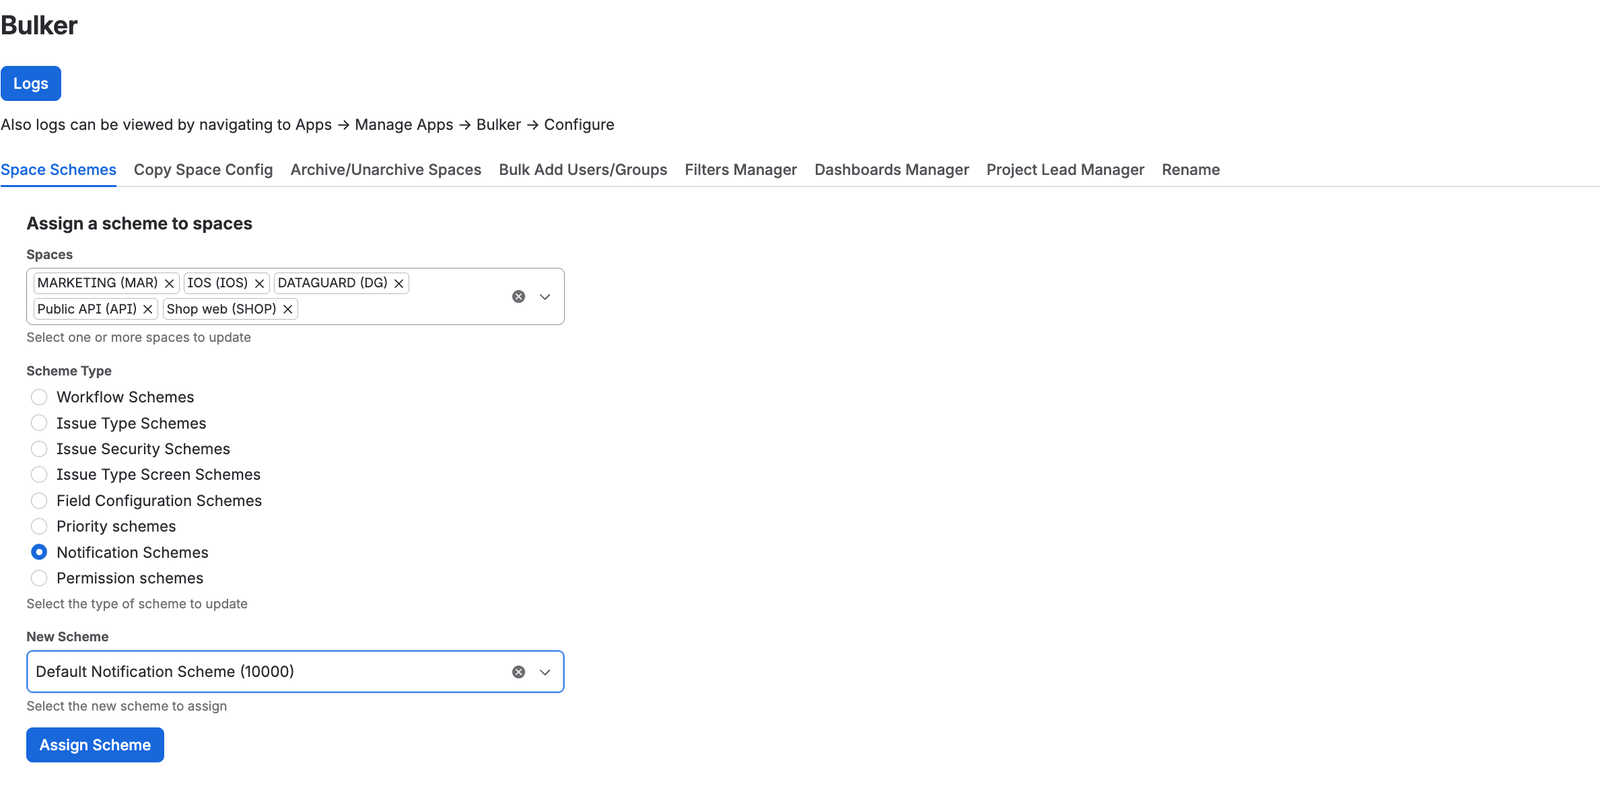
Five spaces, one scheme type, one new scheme — then Assign Scheme
How to bulk change Jira schemes for multiple projects, step by step
Step 1 — Open the tab
Go to Settings → Apps → Bulker. The admin page opens on Space Schemes. Bulker loads every project on the site into the spaces list, including team-managed ones — more on those below.
Step 2 — Pick the spaces
In Spaces, type to search and tick the projects you want to change; each entry shows the project as "Name (KEY)". The helper text says what the field expects: Select one or more spaces to update. The field is required, and the number of projects you tick is the number of assignments Bulker will run.
Step 3 — Choose the scheme type
Under Scheme Type, pick one of the eight radio buttons. Workflow Schemes is preselected. Switching the type reloads the list of schemes and clears whatever you had chosen in the next field, so the scheme you assign always belongs to the type you see.
Step 4 — Choose the new scheme
New Scheme is a searchable, clearable dropdown of every scheme of that type on the site, each shown as "Name (id)" — for example Default Notification Scheme (10000). The id is there because two schemes can carry similar names; the number is what Jira actually assigns.
Step 5 — Press Assign Scheme
Assign Scheme runs the assignments one project after another. There is no confirmation dialog and no preview in this tab: the button is the action. When the run ends, one message appears per project:
- a green message with the project name and Scheme assigned.
- a red message with the project name and Jira's own reason when the assignment was refused
- a blue message when Jira accepted the change but was still applying it: Assignment started (Jira task …). Jira is still applying it — check the space settings shortly.
If the license check fails on a project, Bulker stops the run there and shows a License error instead of continuing with the remaining projects.
Changing a workflow scheme on Jira projects with issues
Jira only lets a workflow scheme be assigned directly to an empty project. For a project with issues, Jira requires a status mapping for every issue type whose current statuses are not all in the new workflow, and then runs the migration as a background task.
Bulker handles this in two steps. It first tries the direct assignment. When Jira answers that only empty projects can be assigned that way, Bulker reads the project's issue types and statuses, the target scheme and its workflows, and derives the mapping itself. For each old status, the rule is:
- the same status, if the new workflow has it;
- otherwise a status with the same name;
- otherwise the first status of the same category (To Do, In Progress, Done);
- otherwise the workflow's initial status.
Bulker then submits the switch with that mapping and waits for Jira's migration task for a short while. If the task is finished in time, the project shows Scheme assigned.; if Jira is still working, you get the blue "Assignment started" message with the task reference, and the operation log keeps following it (see below).
NOTE: In this tab the derived mapping is applied without a review step — the issues move to the statuses the rule picks. If you want to see and adjust every status move before anything happens, use the Copy Space Config tab, where the migration is shown and can be edited before the apply.
Three other scheme types also run in the background on Jira's side and are handled the same way: Issue Security Schemes (Jira returns a task that Bulker follows; if another task is already running for that scheme, Bulker reports "Another task is already running for this issue security scheme. Try again in a few minutes."), Priority schemes (when a project's issues use priorities the new scheme does not contain, Bulker maps each to the priority with the same name in the target scheme, otherwise to the scheme's default priority) and, with no task but a dual API path, Field Configuration Schemes (Bulker uses Jira's newer field-schemes interface where the site has it, and falls back to the previous one where it does not).
Why Jira refuses to assign a scheme
Bulker does not pretend an assignment worked. Where Jira refuses, the red message and the log row carry Jira's explanation, and these cases come up regularly:
- Issue type schemes whose types are in use. If issues in the project use an issue type the new scheme lacks, Jira refuses the assignment. There is no REST equivalent of the migration wizard in Jira's UI, so Bulker cannot work around it. Change those issues' types in Jira first, or assign a scheme that contains them.
- Team-managed projects. They do not accept shared schemes. The spaces list shows them anyway, and Jira refuses the assignment with its own message.
- Permissions. If the app is not allowed to change the scheme, Bulker reports "The app is not allowed to change this scheme (Administer Jira permission required)."
What the operation log shows
Press Logs at the top of the Bulker page, or open Apps → Manage apps → Bulker → Configure. The Operation log has the columns Timestamp, User, Space, Type, Description and Status, with a time range of 30 minutes, 7 days, 30 days or All.
For a scheme assignment, Type is the scheme type you chose and Description is the new scheme's name; when Jira refused, the description reads "scheme name: Jira's reason". Status is one of four lozenges: Done, Failed, In progress, or Unconfirmed.
Two details matter for reading it right:
- Every operation is listed, successful ones included. The line above the table reads "Operations: N total — N succeeded, N failed, N still running." The table keeps each operation in detail, up to 2,000 rows per operation, and the operations Jira was still applying when Bulker stopped waiting.
- "In progress" gets resolved. Each time Bulker opens, it asks Jira about the pending tasks it has on record. A finished task turns the row to Done, a failed one to Failed, and if Jira no longer knows the task, the row becomes Unconfirmed — Jira drops finished tasks after a while, and an audit log should not record "very likely" as fact. Check the project settings in that case.
The log keeps entries for 7 days on a trial, 45 days on the Standard edition and 365 days on the Advanced edition. The same log rules apply to every Bulker operation; they were introduced in the September 2026 release.
Can you undo a bulk scheme change? Plan before you press
The Space Schemes tab has no undo. A successful assignment is counted in the totals, not stored with the previous scheme, so Bulker cannot put the old scheme back. And a workflow switch moves issues to new statuses — the scheme can be reassigned, but the status moves are not reversed by reassigning it.
Before a large run, note the schemes the projects currently use, and try the assignment on one project first. If you need an undo, the Copy Space Config tab records what each copy replaced and can restore it; the Space Schemes tab is the quick tool for the case where you already know the target scheme.
Trial limits and editions
On a trial license, Bulker checks the number of selected projects before starting: more than 5 projects per operation stops the run with the warning Trial limit reached — "You can only process 5 projects per operation. Reduce your selection, or purchase a license for unlimited access." The trial also caps operations at 20 per day and 100 in total across all Bulker tabs.
Scheme assignment is available in every edition. The Advanced edition is required only for Bulker's Jira Automation actions, not for this tab. If Bulker cannot verify the license at all, it refuses to run rather than guess: "Could not verify the app license. Please try again in a moment."
FAQ
Can I assign a workflow scheme to Jira projects that already have issues?
Yes. For a project with issues Bulker switches the scheme with a derived status mapping — same status, else same name, else same category, else the workflow's initial status — and waits for Jira's migration task. The moves are applied without a review step in this tab; the Copy Space Config tab shows them first.
How do I change the permission scheme for multiple Jira projects at once?
Open Settings → Apps → Bulker, tick the projects in Spaces, choose Permission schemes under Scheme Type, pick the scheme in New Scheme and press Assign Scheme. Each project then shows Scheme assigned. or Jira's reason for refusing.
Why does Jira refuse to assign an issue type scheme?
Usually because issues in the project use an issue type the new scheme does not contain. Jira has no REST way to migrate those issues, so Bulker shows Jira's refusal. Change the issues' types first, or assign a scheme that includes them.
How do I undo a bulk scheme change made with Bulker?
The Space Schemes tab has no undo: successful assignments are counted, not stored with the previous scheme. Note the current schemes before a run, or use the Copy Space Config tab, which records what it replaced and can restore it. Status moves from a workflow switch are not reversed by reassigning the old scheme.
How many projects can I change per run on the trial?
5 projects per operation. Selecting more shows Trial limit reached before anything is changed. The trial also allows 20 operations per day and 100 in total; a paid license removes these limits.
Do I need the Advanced edition to bulk assign schemes?
No. The Advanced edition is required only for Bulker's Jira Automation actions. The Space Schemes tab works in every edition.
Try Bulker
Bulker takes the repetitive side of Jira administration off your hands — scheme assignment across projects, copying a project's configuration, roles, project leads, archiving and renaming. For the latest changes to scheme assignment and the operation log, see the Bulker release notes — September 2026. For the wider picture, see Bulk Jira admin: how to save 3 hours a week.
More guides in this series:
- How to add a user to multiple Jira projects at once
- How to change the project lead in multiple Jira projects at once
- How to bulk archive Jira projects (and unarchive them)
- How to bulk rename Jira schemes, screens and filters
- Change the workflow scheme on Jira projects that already have issues
- How to change the permission scheme of multiple Jira projects See the guide: How to copy a Jira project configuration to existing projects.